
Basic Template: How to create and edit products
Use the Basic template to create products or update existing product information in Excel. Choose the products, languages and information you want to work with, download your template, fill it in and upload your changes to SQARP.
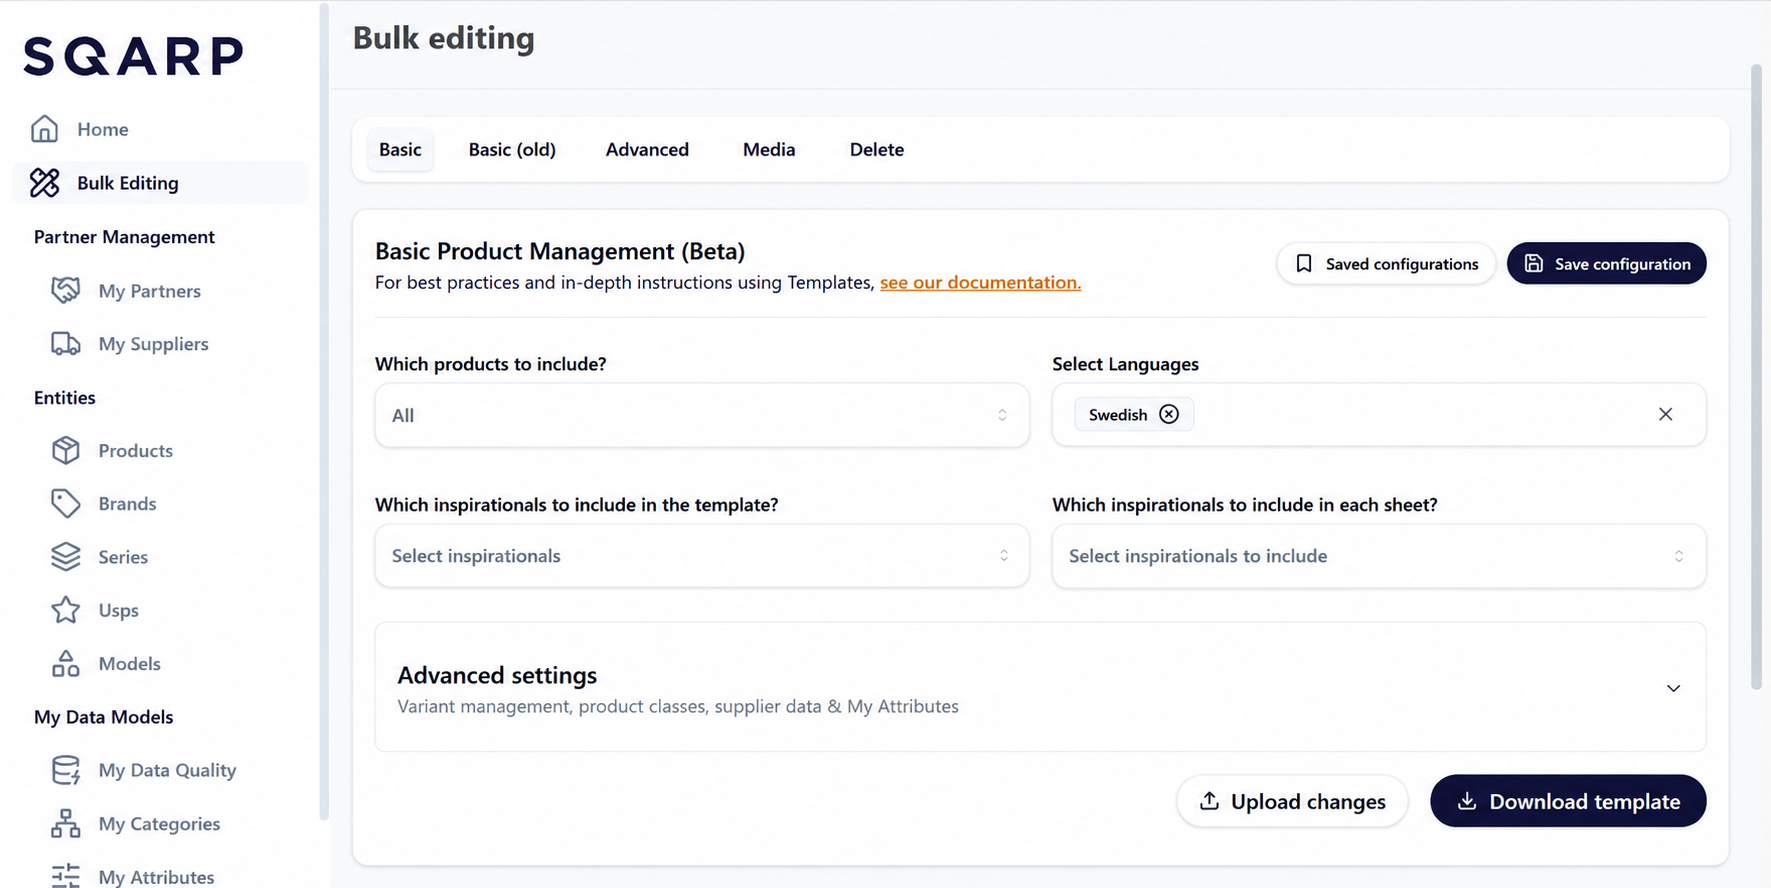
Example view: open Bulk Editing and select Basic, to the left of Basic (old).
The template adapts to your configuration. Start with core product and brand fields, then include market information, supplier data, variants, categories, relations, media and attributes as needed.
Blank cells clear existing values. When updating a product, keep the downloaded value in any included cell you want to preserve. Enter a new value to replace it, or leave the cell blank to clear it. Fields excluded through the configuration remain unchanged. Complete all fields marked in red in row 4.
1. Choose which products to include
Open Bulk Editing and select Basic. Under Which products to include?, choose your starting point.
Option | When to use it |
|---|---|
None | Start without existing product rows, for example when creating new products. |
All | Include your existing products for a broader update. |
Specific | Use the product picker to find and select the products you want to edit. |
For updates, start from a fresh download so you retain the current values that should remain unchanged.
Article Number determines whether you create or update a product. An article number that already exists in your organisation updates that product. A new article number creates a new product.
2. Configure your template
Choose the sections for your organisation
Section | Who should use it |
|---|---|
Market information | Suppliers providing product information for the markets they supply. |
Supplier information | Organisations purchasing products from suppliers. |
Unverified Attributes | The default option for working with product attributes. |
Categories and My Attributes | Full PIM users, for example organisations running their webshop through SQARP. If you do not use SQARP as a full PIM, leave these sections out. |
Languages and inspirationals
Use Select Languages to choose your languages. Language-specific columns carry a code, such as Name [sv], Name [en] or Name [fi]. Enter each translation in the matching column.
Under Which inspirationals to include in the template?, select USPs, Series and/or Models. Use Which inspirationals to include in each sheet? to choose all inspirationals or those relevant to the selected products.
Advanced settings
Expand Advanced settings and enable the sections needed for your task. A focused configuration makes it easier to review the information you intend to change.
Setting | What it includes |
|---|---|
Identifiers | Choose All, Relevant for selected products, Specific or None. With Specific, select the identifier types you need. The dropdown includes EAN, GTIN13, GTIN14, UNSPSC and other identifiers. |
Markets | For suppliers: select the market you supply. Columns carry its code, such as |
Categories | For full PIM users only: include all categories, specific categories, categories relevant to selected products, or none. Otherwise, choose None. |
Relations | Select Accessories, Add-ons, Spare parts, Components, Fits to and/or Replaces. Set Include quantities for product relations? to Yes to specify the recommended quantity of each related product. Default: No. |
Include virtual data and variant management? | Choose Yes to include fields for manually creating the variant structure. With No, existing variant groups remain unchanged. |
Include variant swatch images? | Under variant management, choose Yes to add a swatch image for a selectable value. Default: No. |
Packaging information | Include packaging type, material, GTIN14 and parcel measurements. |
Image URLs | Choose Yes to enter image URLs in the workbook. Enable Include image type? to classify images. Image types are excluded by default. |
Document URLs | Choose Yes to enter document URLs in the workbook. |
Videos | Include video URLs. One combined option adds video type and language codes; its default is No. |
Descriptions | Include description headings, text and bullets. |
Special product classes | Include Product Class when specifying classes such as bundles, components, services or made-to-order products. With No, existing products retain their class and new products have an empty Product Class. |
Supplier data | For organisations purchasing products from suppliers: include supplier-specific information. Additional options cover purchase prices, recommended prices, life-cycle dates, delivery time and delivery notes. |
Unverified Attributes | The default option for product attributes. Include the unverified attribute columns from your product data. |
My Attributes | For full PIM users only: choose All, By Tags, By Blueprint Attributes, Specific, Relevant for selected products or None. Otherwise, choose None and use Unverified Attributes. |
Click Download template when your configuration is complete.
Save and reuse a configuration
Click Save configuration, enter a name and optionally a description, then choose its visibility. Organisation makes it visible to everyone in your organisation. Private keeps it for your own use.
Save the configuration. To reuse one, open Saved configurations and find it by name or description.
Configurations retain your template settings, including languages, market, inspirationals, packaging, market data, media and advanced settings. Product selection is not saved. Choose products each time you download a template.
3. Understand the workbook
Sheet | Purpose |
|---|---|
Products | One product per row, with its identifiers and the information selected for the export. |
Brands | Brand identifiers, translated names, logos and other brand content. |
Inspirationals | Series, USPs and models, when included. |
Reference sheets | Available values for packaging types, supplier slugs, category nodes, media types and attributes. Use the reference sheets included in your download. |
In Products, Brands and Inspirationals, the first four rows explain the fields:
Row | Contents |
|---|---|
1 | Main section, such as Order & Logistics or Media. |
2 | Subsection or attribute type and input format. |
3 | Field description. Attribute columns may instead show the attribute name or group. |
4 | Column header. Required fields are marked in red. |
5 onward | Your data. |
Fields marked in red cannot be left empty. The markings are in row 4. When market or supplier sections are included, their required fields must be filled for every product row. Check the required fields in Brands and Inspirationals when adding rows to those sheets.
Choose columns through the configuration
Best practice is to configure the template before downloading it. Fields excluded through the configuration leave their existing values unchanged.
Manual column deletion is possible, but some columns depend on others: deleting one may require removing additional columns. Use the configuration to generate the selection you need, and keep the generated sheet names and header structure.
Add more numbered items
A number at the end of a header identifies a repeated item: Image URL 1 and Image Type 1, for example, describe the same image.
You can add more images, documents, descriptions, relations, parcels and selectables by copying the complete related column group and incrementing its number. Preserve rows 1–4 and keep related fields together. For example, if your template has Image URL 1 and Image Type 1, copy both to create Image URL 2 and Image Type 2. The number of items in the downloaded workbook is not a fixed limit.
4. Fill in product information
Product base and identifiers
Field | What to enter |
|---|---|
Article Number | The article number you use to identify the product. Retain it when updating that product. |
Manufacturer Article Number | The manufacturer's article number. |
Country of Origin | The product's country of origin, using a two-letter country code such as SE or CN. |
Taric Code | The product's 10-digit customs classification code. Store it as text to preserve leading zeros. |
Product Class | The product's class, such as a standard product, component, bundle or service. |
Brand | The brand reference. Use the corresponding identifier from the Brand column in the Brands sheet. |
Identifier \[type\] | The value for that identifier type. For example, Identifier \[ean\] contains the EAN, and Identifier \[unspsc\] contains the UNSPSC identifier. |
Keep article numbers and identifiers as text in Excel when necessary to preserve leading zeros or long digit sequences. Identifiers shown in an example workbook are a selection; choose from the available types in the configuration dropdown.
Packaging
Use Packaging Type and Packaging Material to describe the primary package, and GTIN14 for its packaging identifier. The Packaging Types reference sheet lists available type slugs.
For each numbered parcel, enter weight in kilograms, volume in cubic metres, and height, width and depth in millimetres. Keep measurements for the same parcel under the same number.
Market information for suppliers
Use market information when your organisation is a supplier. These fields describe the products you supply in a particular market. Sweden uses [SWE].
Field | What to enter |
|---|---|
Market Article Number \[SWE\] | The article number used in that market. |
Market product title | The product title used in the market, in the relevant language. |
Status \[SWE\] | ACTIVE, INACTIVE, DISCONTINUED, UNRELEASED or TO\_BE\_DISCONTINUED. |
Pricing Unit / Packaging Unit | The units used for pricing and packaging in the market. |
Packaging multiple | The market's packaging multiple, included when units are enabled. |
RRP / RRP Currency / RRP Unit | The recommended retail price excluding VAT, its currency code, such as SEK, and the unit it applies to. |
Release Date / Discontinued Date | Dates in YYYY-MM-DD format. |
Max Delivery Days | The maximum delivery time in working days. |
Minimum Order Quantity | The smallest quantity a customer can order. |
Delivery Notes | Delivery information in the indicated language, for example Delivery Notes \[sv\] \[SWE\]. |
Supplier information for purchasing organisations
Use supplier information when your organisation purchases products from suppliers. These fields describe the product at one of your suppliers. Use its slug from My Suppliers, then enter the supplier's article number and status. Complete the red-marked fields in that section.
Purchase Price is the price you pay the supplier, excluding VAT. Recommended retail price also excludes VAT and has its own fields. Enter the corresponding currency and unit for each price. Supplier information can also include release and discontinued dates, delivery time, minimum order quantity, translated titles and delivery notes.
Keep fields for the same supplier under the same numbered set.
5. Group variants and assign categories
Virtual Reference and selectables
Products with the same Virtual Reference belong to the same virtual, or product group. Use a shared reference for variants that should be presented together.
If you exclude virtual data and variant management from the template, existing variant groups remain unchanged.
Product Type describes what the product is. Virtual Name names the group or model. Enter language-specific values in their corresponding columns and use consistent group information across variants.
A Selectable Key is the property a customer chooses, such as Colour. Its Selectable Value is the value for that variant, such as Black.
Article Number | Virtual Reference | Selectable Key \[en\] 1 | Selectable Value \[en\] 1 |
|---|---|---|---|
CHAIR-BLACK | chair-linea | Colour | Black |
CHAIR-WHITE | chair-linea | Colour | White |
For a second selectable property, use the matching Key 2 and Value 2 fields. When Include variant swatch images? is enabled, enter a swatch image URL in the field accompanying that selectable. The image represents its value, such as Black, and can be reused for products sharing that value.
Categories for full PIM users
Categories are only relevant when your organisation uses SQARP as a full PIM, for example to run its webshop. Find the node slug in Category Nodes and enter it in the column for the correct tree, such as Category Node [tree-slug]. Separate multiple node slugs with a pipe: node-a|node-b.
6. Add product relations
Use the relation section matching the connection you want to create: Accessories, Add-ons, Spare Parts, Components, Fits To or Replaces. Enter the related product's article number in its corresponding field.
For example, Accessory Article Number 1 identifies the first accessory. If recommended quantities are enabled, enter its recommended quantity in Accessory Quantity 1. Pair each quantity with the article number bearing the same number.
Add-on fields also include Addon Category, which takes the add-on category slug.
7. Add descriptions and media
Descriptions
A description block contains a heading, text and bullets. Fill in Description Header, Description Value and Description Bullets for each language and block number.
Separate bullets with a pipe. For example, Easy to assemble|Removable cover|Suitable for indoor use supplies three bullets.
Images, documents and videos
Content | Fields and input |
|---|---|
Images | Enter the URL in Image URL 1. When types are included, choose a value from Image Types for Image Type 1, such as ISOLATED, ENVIRONMENT or CLOSE\_UP. |
Documents | Enter the URL, document type and language codes in matching numbered fields. Use Document Types for type values. Separate multiple language codes with a pipe, for example `sv\ | en`. |
Videos | Enter the video URL. When metadata is included, add Video Type and Video Language Codes. Video Types includes MARKETING\_VIDEO and ASSEMBLY\_INSTRUCTION. Separate multiple language codes with a pipe. |
Use each numbered set for one media item. Keep its URL, type and language information under the same number.
8. Fill in attributes
Unverified Attributes: the default option
Start with Unverified Attributes when adding or updating product specifications, such as colour, material, dimensions or weight. This is the default option for working with attributes in the Basic template.
Each column represents an attribute in a particular language and group. Each product row contains that product's value. For example, a Colour column can contain Black for one product and White for another.
Enter one value per Unverified Attribute cell. Multiple values in the same cell are not supported; do not use pipe-separated lists in this section.
Find the right column
Read the three rows above the product data together:
- Row 2 identifies the language. For example, Unverified Attributes \[en\] is for English values, while \[sv\] is for Swedish.
- Row 3 identifies the attribute group. A group such as Specifications keeps related properties together.
- Row 4 names the attribute. This is the property whose value you enter, such as Colour or Material.
The example below shows two attribute columns and two product rows. Each product's Article Number and other selected fields appear elsewhere on the same row.
Excel row | First attribute column | Second attribute column |
|---|---|---|
2: language | Unverified Attributes \[en\] | Unverified Attributes \[en\] |
3: group | Specifications | Specifications |
4: attribute name | Colour | Material |
5: first product | Black | Steel |
6: second product | White | Aluminium |
Add or update attribute values
- Include Unverified Attributes in your template configuration and select the languages you need.
- Find the product's row using its Article Number.
- Check the attribute's language, group and name, then enter the value in that product's row.
- Repeat for the other relevant attributes and languages. Use consistent wording for comparable values.
For translated attributes, fill in each language's column separately. For example, an English Colour value might be Black, while the corresponding Swedish value is Svart. Check the language even when an attribute name looks the same in more than one column.
When editing existing products, retain the downloaded attribute values you want to keep. Replace a value to change it, or leave its cell blank to clear it. Review blank attribute cells before uploading.
Create a new Unverified Attribute
Copy an existing Unverified Attribute column, including its first four rows. Keep the Unverified Attributes section structure, then set the language in row 2, the attribute group in row 3 and the new attribute name in row 4. Enter one value for each relevant product from row 5 onward.
My Attributes for full PIM users
My Attributes are only relevant to organisations using SQARP as a full PIM, for example to run a webshop. They use your organisation's attribute definitions. Row 2 describes the input type, row 3 identifies the attribute, and row 4 contains its slug or language-specific header. Use the My Attribute reference sheet to check types and available select values.
Type | Input | Example |
|---|---|---|
Boolean | A true or false value. | TRUE or FALSE |
Single Select | One allowed value slug. |
|
Multi Select | Allowed value slugs separated by a pipe. | `value-a\ | value-b` |
Integer / Decimal | A number, or the range and multiple-value format indicated in row 2. |
|
Free Text | Text; use a pipe for multiple values where row 2 specifies it. | `First value\ | Second value` |
Localized Text | Text in the language specified by the column. | English text in the \[en\] column. |
The example select slugs illustrate the format. Replace them with allowed values for your attribute. A pipe-separated list of available values in the reference sheet does not mean a Single Select attribute accepts several values at once.
9. Create or edit brands and inspirationals
In Brands, use one row per brand. Enter the brand's identifier (slug) in Brand, its translated display name in the Name columns, and its logo URL. Depending on the template, you can also add descriptions and media. Use the same Brand identifier in Products to connect products to the brand.
In Inspirationals, enter Type as usp, series or model and a Slug unique within that type. The Name columns come before Brand: enter the translated names, then the brand identifier. Descriptions and media use the same language and numbering patterns as Products.
Connect products to these entries using the corresponding Series, USP or Model fields in Products.
10. Review and upload your changes
Check what will change
For an existing value, the cell you upload determines the result:
Existing value | Uploaded cell | Result |
|---|---|---|
Black | Black | The value remains Black. |
Black | White | The value becomes White. |
Black | Blank | The existing value is cleared. |
Review blank cells before uploading, especially after copying data between files. Keep existing values wherever you want to preserve them. Required fields marked in red must contain values.
Check that identifiers retain their full digits, translations are in the correct columns, reference values match the relevant sheets, and numbered fields remain paired correctly.
Upload, validate and publish changes
- Upload. Save the workbook, return to Bulk Editing > Basic, click Upload changes and select your file.
- Validation. Review the result. If errors are reported, correct the workbook and validate it again.
- Publish changes. After successful validation, click Publish changes to apply your updates.
You can find your uploaded projects in Project Log.